Technical Indicator

Understanding Bears Power: A Key Indicator for MetaTrader 5
MetaTrader5
Understanding Bears Power: A Key Indicator for MetaTrader 5

When it comes to trading, it's all about the tug-of-war between buyers, or 'Bulls,' pushing prices higher, and sellers, or 'Bears,' driving prices down. The outcome of this daily battle determines whether we see a price increase or decrease compared to the previous day. By examining key metrics, like the highest and lowest prices, we can get a sense of how the day's skirmish unfolded. One crucial aspect to keep an eye on is the balance of Bears Power. Changes in this balance can signal potential trend reversals, which is where the Bears Power oscillator, crafted by Alexander Elder, comes into play. You can find more about it in his book, "Trading for a Living: Psychology, Trading Tactics, Money Management". Elder's oscillator is based on two key premises: The moving average reflects the price equilibrium between buyers and sellers over a certain period. The lowest price during the day indicates the peak power of sellers. Using these foundations, Elder developed the Bears Power indicator, calculated as the difference between the lowest price and the 13-period exponential moving average (LOW - EMA). How to Use Bears Power:For best results, pair this indicator with a trend indicator, typically a Moving Average. Here’s how to interpret it: If the trend indicator is pointing upwards and the Bears Power index is below zero but increasing, consider it a buy signal. Ideally, look for divergence forming in the indicator chart during this setup. Calculation:The first step in calculating this indicator is to determine the exponential moving average, with the 13-period EMA generally being recommended. BEARS = LOW - EMA Where: BEARS - Bears' Power; LOW - The lowest price of the current bar; EMA - Exponential Moving Average. During a downtrend, the LOW will be below the EMA, resulting in a Bears Power reading below zero and a histogram positioned under the zero line. Conversely, if the LOW surpasses the EMA during a price rally, the Bears Power turns positive, and the histogram climbs above the zero line.

2010.01.26
Mastering Bollinger Bands: A Trader's Guide to MetaTrader 5
MetaTrader5
Mastering Bollinger Bands: A Trader's Guide to MetaTrader 5

Bollinger Bands® are a popular technical indicator that many traders swear by. If you're using MetaTrader 5, you might find these bands particularly useful for gauging market volatility. Unlike Envelopes, which are set at a fixed distance from a moving average, Bollinger Bands adjust dynamically based on standard deviations from that average. This means they can widen or contract depending on market conditions, giving you a clear visual cue about volatility. Typically plotted over your price chart, Bollinger Bands can also be added to your indicator chart. The key takeaway here is that prices generally hover between the upper and lower bands. One of the standout features of Bollinger Bands is their variable width: when the market is hot and prices are fluctuating wildly, the bands widen. Conversely, during quieter times, they tighten up, keeping prices within a narrower range. Here are some essential traits of Bollinger Bands that every trader should keep in mind: Sudden price changes often occur after the bands have contracted, indicating a potential breakout. If prices breach the upper band, you might expect the current trend to continue. Conversely, if you see peaks and troughs breaking through the bands followed by movements within the bands, a trend reversal could be on the horizon. Typically, a price movement that starts at one band line tends to reach the opposite band. This last observation can be incredibly helpful for predicting potential price targets. Bollinger Band Indicator How to Calculate Bollinger Bands: Bollinger Bands consist of three lines: the middle line (ML), which is a standard Moving Average. Here's how to calculate it: ML = SUM (CLOSE, N) / N = SMA (CLOSE, N) The upper band (TL) is positioned a set number of standard deviations (D) above the middle line: TL = ML + (D * StdDev) The lower band (BL) is simply the middle line minus the same number of standard deviations: BL = ML - (D * StdDev)Where: SUM (..., N) - the sum over N periods; CLOSE - the closing price; N - the number of periods used in the calculation; SMA - Simple Moving Average; SQRT - square root; StdDev - standard deviation: StdDev = SQRT (SUM ((CLOSE — SMA (CLOSE, N))^2, N)/N) For best results, many traders use a 20-period Simple Moving Average as the middle line, placing the upper and lower bands two standard deviations away. Keep in mind that using moving averages shorter than 10 periods might not yield significant insights.

2010.01.26
Understanding the Alligator Indicator for MetaTrader 5
MetaTrader5
Understanding the Alligator Indicator for MetaTrader 5

The Alligator Indicator is a unique technical tool that combines Balance Lines (or Moving Averages) using fractal geometry and nonlinear dynamics. If you’re looking to dive deeper into this concept, check out B. Williams' book: "New Trading Dimensions: How to Profit from Chaos in Stocks, Bonds and Commodities". Key Components of the Alligator Indicator 
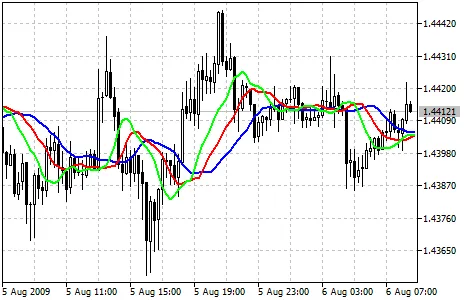
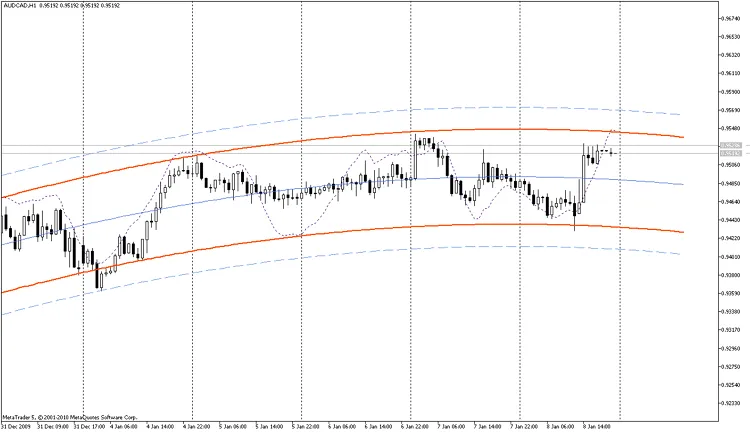
The Blue Line (Alligator's Jaw): This is the Balance Line for the timeframe used to create the chart, calculated as a 13-period Smoothed Moving Average (SMA), shifted 8 bars into the future. The Red Line (Alligator's Teeth): This represents the Balance Line for a timeframe one level lower, calculated as an 8-period SMA, shifted 5 bars into the future. The Green Line (Alligator's Lips): This is the Balance Line for the next lower timeframe, calculated as a 5-period SMA, shifted 3 bars into the future. The interaction between the Lips, Teeth, and Jaw of the Alligator provides insight into different time periods. Remember, clear trends appear only 15% to 30% of the time, so it’s crucial to follow them and avoid getting caught up in sideways markets. When you notice the Jaw, Teeth, and Lips are closed or tangled, it indicates that the Alligator is either asleep or getting ready to wake up. The longer it sleeps, the hungrier it becomes. When it finally awakens, it opens its mouth and yawns, sniffing out potential trades—whether it’s a bullish or bearish opportunity. After chowing down on enough pips, the Alligator loses interest in the price (the Balance Lines converge), signaling it’s time to lock in profits. Alligator Indicator How to Calculate the Alligator Indicator Calculation: MEDIAN PRICE = (HIGH + LOW) / 2 ALLIGATOR'S JAW = SMMA (MEDIAN PRICE, 13, 8) ALLIGATOR'S TEETH = SMMA (MEDIAN PRICE, 8, 5) ALLIGATOR'S LIPS = SMMA (MEDIAN PRICE, 5, 3) Where: MEDIAN PRICE - the average price; HIGH - the highest price of the bar; LOW - the lowest price of the bar; SMMA (A, B, C) - Smoothed Moving Average. A is the data to smooth, B is the smoothing period, and C is the future shift. For instance, SMMA (MEDIAN PRICE, 5, 3) calculates the smoothed moving average based on the median price, with a smoothing period of 5 bars and a shift of 3. ALLIGATOR'S JAW - Alligator's jaws (the blue line); ALLIGATOR'S TEETH - Alligator's teeth (the red line); ALLIGATOR'S LIPS - Alligator's lips (the green line).

2010.01.26
Understanding the Accumulation/Distribution Indicator for MetaTrader 5
MetaTrader5
Understanding the Accumulation/Distribution Indicator for MetaTrader 5

The Accumulation/Distribution (A/D) indicator is a powerful tool that traders use to gauge the relationship between price movement and trading volume. Simply put, it weighs price changes against the volume of trades. The larger the volume, the bigger the impact on the indicator's value. Think of it this way: the A/D indicator is a cousin of the widely-known On Balance Volume (OBV). Both indicators serve to confirm price trends by analyzing the volume of trades. When you see the A/D indicator rising, it suggests that investors are accumulating (or buying) the asset, as most of the trading volume is happening during an upward price trend. Conversely, when the A/D indicator dips, it signals distribution (or selling), indicating that a majority of trades occur as prices fall. Divergences between the A/D indicator and the asset’s price can hint at potential market reversals. For example, if the A/D is climbing while the price is falling, you might want to brace for a price turnaround. How to Calculate the A/D Indicator: To compute the A/D value, a portion of the day’s volume gets added to or subtracted from the previous indicator value. If the closing price is closer to the day’s high, more volume is added; if it’s closer to the day’s low, more volume is deducted. If the closing price lands right in the middle, the indicator remains unchanged. A/D(i) = ((CLOSE(i) - LOW(i)) - (HIGH(i) - CLOSE(i)) * VOLUME(i) / (HIGH(i) - LOW(i)) + A/D(i-1) Where: A/D(i) - the current value of the Accumulation/Distribution indicator; CLOSE(i) - the closing price of the current bar; LOW(i) - the lowest price of the current bar; HIGH(i) - the highest price of the current bar; VOLUME(i) - the trading volume; A/D(i-1) - the value of the A/D indicator from the previous bar.

2010.01.26
Understanding the Awesome Oscillator (AO) for MetaTrader 5
MetaTrader5
Understanding the Awesome Oscillator (AO) for MetaTrader 5

If you're looking to add a robust indicator to your trading toolkit, the Awesome Oscillator (AO), developed by Bill Williams, is a fantastic choice. This indicator measures market momentum by calculating the difference between a 5-period and a 34-period simple moving average based on the median price of the bars, which is computed as (High + Low) / 2. The AO provides traders with insightful signals about the current market driving force. If you’re keen to dive deeper into this, check out Bill Williams's book, New Trading Dimensions. Buy Signals Here are the main signals to look for when considering a buy: Saucer Signal: This signal occurs when the bar chart is above the zero line. Look for three columns: the first column is higher than the second (red), and the third column is higher than the second (green). Remember, all columns must be above the zero line for this signal to be valid. Zero Line Crossing: This signal happens when the bar chart crosses from negative to positive. For this signal to trigger, you'll need just two columns: the first below the zero line and the second crossing it. Two Pikes Signal: This signal appears when both peaks are below the zero line. The first peak is the lowest (pointing down), followed by a second peak that is slightly higher but still negative. Ensure the bar chart remains below the zero line between these peaks. Keep in mind, if the bar chart crosses the zero line between the two pikes, you’ll get a zero line crossing signal instead. Sell Signals The Awesome Oscillator generates sell signals in a similar manner: Saucer Signal: The reverse of the buy signal, where the bar chart is below the zero line. Zero Line Crossing: This occurs when the first column is above the zero line while the second is below it, indicating a downward trend. Two Pikes Signal: Just like the buy signal, but the peaks are now above the zero line. Awesome Oscillator Indicator Calculation To calculate the AO, you’ll need to determine the median price first: MEDIAN PRICE = (HIGH + LOW) / 2 AO = SMA (MEDIAN PRICE, 5) - SMA (MEDIAN PRICE, 34) Where: MEDIAN PRICE: The average of the highest and lowest price of the bar. HIGH: The highest price in the selected period. LOW: The lowest price in the selected period. SMA: Simple Moving Average. Incorporating the Awesome Oscillator into your trading strategy can provide you with a clearer picture of market momentum and help you make more informed decisions. Happy trading!

2010.01.08
Understanding the Accumulation Swing Index (ASI) for MetaTrader 5
MetaTrader5
Understanding the Accumulation Swing Index (ASI) for MetaTrader 5

The Accumulation Swing Index (ASI) is a powerful tool developed by Welles Wilder to help traders navigate the often turbulent waters of price fluctuations. Wilder famously noted, "Somewhere amidst the maze of Open, High, Low, and Close prices is a phantom line that is the real market." The ASI is designed to help us uncover that phantom line. In his book, "New Concepts in Technical Trading Systems", Wilder elaborates on the ASI, stating: "When the Index is plotted alongside the daily bar chart, the trend lines on the ASI can be compared with those on the bar chart. For traders adept at drawing meaningful trend lines, the ASI can serve as a valuable confirmation tool for trend-line breakouts. Often, false breakouts on bar charts won't be validated by the ASI's trend lines, thanks to its focus on closing prices. This means that a quick price spike during the day won't skew the index too much." The ASI aims to reflect the "real market," making it closely aligned with actual price movements. This characteristic allows traders to apply traditional support and resistance analysis to the ASI. Common strategies include watching for breakouts, identifying new highs and lows, and spotting divergences. Here are some key features of the ASI highlighted by Wilder: It provides quantitative insights into price shifts; It identifies short-term turning points; It offers clarity on the market's true strength and trend. Accumulation Swing Index Indicator Calculation: SI(i)=50*(CLOSE(i-1)-CLOSE(i)+0.5*(CLOSE(i-1)-OPEN(i-1))+0.25*(CLOSE(i)-OPEN(i))/R)*(K/T) ASI(i) = ASI(i-1) + SI(i) Where: SI(i) - current value of the Swing Index; SI(i-1) - value of the Swing Index from the previous bar; CLOSE(i) - current close price; CLOSE(i-1) - previous close price; OPEN(i) - current open price; OPEN(i-1) - previous open price; R - a parameter derived from a complex formula based on the ratio of the current close price to the previous maximum and minimum; K - the greater of two values: (HIGH(i-1) - CLOSE(i)) or (LOW(i-1) - CLOSE(i)); T - the maximum price change during the trading session; ASI(i) - current value of the Accumulation Swing Index.

2010.01.08
Mastering the Adaptive Moving Average (AMA) for Your Trading Strategy
MetaTrader5
Mastering the Adaptive Moving Average (AMA) for Your Trading Strategy

The Adaptive Moving Average (AMA) is a powerful tool used in MetaTrader 5 that helps traders smooth out price fluctuations while minimizing lag, making it easier to spot trends. This indicator was brought to life by Perry Kaufman in his insightful book, "Smarter Trading". One common pitfall with traditional smoothing algorithms is that sudden price jumps can create misleading trend signals. While smoothing is essential, it often introduces lag that can hinder timely decision-making. The AMA was designed with these challenges in mind, helping you navigate the market more effectively. Adaptive Moving Average Indicator How the AMA Works: To determine the current market state, Kaufman introduced the concept of the Efficiency Ratio (ER). This is calculated using the formula: ER(i) = Signal(i) / Noise(i) Where: ER(i) - current value of the Efficiency Ratio; Signal(i) = ABS(Price(i) - Price(i - N)) - the absolute difference between the current price and the price N periods ago; Noise(i) = Sum(ABS(Price(i) - Price(i-1)), N) - the total of absolute price differences over N periods. In strong trends, the Efficiency Ratio (ER) will approach 1, while in sideways markets, it will hover just above 0. This ER value feeds into the exponential moving average formula: EMA(i) = Price(i) * SC + EMA(i-1) * (1 - SC) Where: SC = 2/(n+1) - the EMA smoothing constant, where n is the period; EMA(i-1) - the previous EMA value. For fast-moving markets, the EMA period should be set to 2 (yielding a fast SC of 0.6667), while during non-trending periods, an EMA period of 30 is recommended (slow SC = 0.06452). This leads us to introduce the scaled smoothing constant (SSC): SSC(i) = (ER(i) * (fast SC - slow SC) + slow SC Or alternatively: SSC(i) = ER(i) * 0.60215 + 0.06425 To make the smoothing constant more effective, Kaufman suggests squaring it. The final calculation for the AMA is as follows: AMA(i) = Price(i) * (SSC(i)^2) + AMA(i-1) * (1 - SSC(i)^2) Rearranged, it looks like this: AMA(i) = AMA(i-1) + (SSC(i)^2) * (Price(i) - AMA(i-1)) Where: AMA(i) - current value of the AMA; AMA(i-1) - prior value of the AMA; SSC(i) - current value of the scaled smoothing constant.

2010.01.08
Mastering the Average Directional Movement Index (ADX) for Trading Success
MetaTrader5
Mastering the Average Directional Movement Index (ADX) for Trading Success

Average Directional Movement Index (ADX), often referred to as ADX Wilder, is a crucial tool for traders looking to identify market trends. This technical indicator is designed according to the methodology laid out by Welles Wilder in his influential book, "New Concepts in Technical Trading Systems". You can find detailed trading rules for the ADX in the Average Directional Movement Index documentation. How the ADX is Calculated: The calculation begins with determining the positive (dm_plus) and negative (dm_minus) movements for each bar, as well as the true range (tr): If High(i) - High(i-1) > 0  dm_plus(i) = High(i) - High(i-1), otherwise dm_plus(i) = 0. If Low(i-1) - Low(i) > 0  dm_minus(i) = Low(i-1) - Low(i), otherwise dm_minus(i) = 0. tr(i) = Max(ABS(High(i) - Low(i)), ABS(High(i) - Close(i-1)), ABS(Low(i) - Close(i-1))) Where: High(i) - highest price of the current bar; Low(i) - lowest price of the current bar; High(i-1) - highest price of the previous bar; Low(i-1) - lowest price of the previous bar; Close(i-1) - closing price of the previous bar; Max(a, b, c) - maximum value among a, b, and c; ABS(X) - absolute value of X. Next, we calculate the smoothed values: Plus_D(i), Minus_D(i), and the Average True Range (ATR): ATR(i) = SMMA(tr, Period_ADX,i)Plus_D(i) = SMMA(dm_plus, Period_ADX,i)/ATR(i)*100Minus_D(i) = SMMA(dm_minus, Period_ADX,i)/ATR(i)*100 Where: SMMA(X, N, i) - Smoothed Moving Average of the X series for the current bar; Period_ADX - number of bars used for calculation. Now, we compute the Directional Movement Index (DX(i)): DX(i) = ABS(Plus_D(i) - Minus_D(i))/(Plus_D(i) + Minus_D(i)) * 100 After these preliminary calculations, we derive the value of the ADX(i) for the current bar by smoothing the DX values: ADX(i) = SMMA(DX, Period_ADX, i)

2010.01.08
Unlocking the Accelerator Oscillator (AC) for MetaTrader 5: A Trader's Guide
MetaTrader5
Unlocking the Accelerator Oscillator (AC) for MetaTrader 5: A Trader's Guide

As traders, we know that price is the last piece of the puzzle to move. Before prices shift, the market's driving force takes a turn. The acceleration of this driving force needs to slow down and hit zero before it starts to gain momentum in the opposite direction. This is where the Accelerator Oscillator (AC) comes into play. The Acceleration/Deceleration indicator helps us measure that momentum. It changes direction before the driving force does, giving us a heads-up before prices shift. Understanding this can give you a significant edge in your trading strategy. The zero line is where the driving force balances out with acceleration. If the AC is above zero, it’s usually easier for the acceleration to keep pushing prices up, and vice versa when it dips below zero. Unlike the Awesome Oscillator, crossing the zero line isn’t a signal to trade. Instead, focus on the color changes of the histogram. A crucial rule to remember: don’t buy when the current column is red, and don’t sell when it’s green. When you’re ready to enter the market, align your trades with the direction of the driving force. If the AC is above zero, it’s a good time to buy; if it’s below, consider selling. You’ll want to see two green columns for a buy signal (or two red for a sell). If the driving force is against your intended position (like the AC being below zero for a buy), you’ll need confirmation — which means looking for three consecutive columns in the same color. So for a short position, aim for three red columns above zero, and for a long position, three green columns below zero. How to Calculate the AC: The AC bar chart is derived from the difference between the 5 and 34 period values of the driving force bar chart and the 5-period simple moving average (SMA) calculated from that chart. MEDIAN PRICE = (HIGH + LOW) / 2 AO = SMA (MEDIAN PRICE, 5) - SMA (MEDIAN PRICE, 34) AC = AO - SMA (AO, 5) Where: MEDIAN PRICE - the median price; HIGH - the highest price of the bar; LOW - the lowest price of the bar; SMA - Simple Moving Average; AO - Awesome Oscillator.

2010.01.07
First Previous 272 273 274 275 276 277