System Trading

Dematus: Your Go-To EA for MetaTrader 5 Trading Success
MetaTrader5
Dematus: Your Go-To EA for MetaTrader 5 Trading Success

Idea Author: Igor MQL5 Code Author: barabashkakvn How It Works Dematus is designed to maximize your trading potential. It opens a position when the price moves from the last opening price (tracked by the m_last_deal_price_IN internal variable) by a specified Distance, provided the iDeMarker indicator signals it’s a good time to enter. If you have no active positions, the EA will wait for the indicator’s permission and then open a position using the Lots volume. For risk management, the default Stop Loss is set at a hefty 999 points, ensuring it rarely gets triggered. There’s no take profit set by default, giving you flexibility. If you do have open positions, you can utilize a trailing stop strategy to lock in profits with the help of Trailing Stop and Trailing Step. The trailing mechanism considers your available equity, managed by the Trailing Equity, Virtual Stop Equity, and Trailing Start Equity variables. Operation Periodicity Once the last position closes, the opening price (the m_last_deal_price_IN variable) resets to zero, while the m_lot variable returns to the Lots volume. By default, the Reset "last price IN" after deal OUT parameter is set to 'false'. If you prefer to reset it after each closing, you can set it to 'true'. We’ve tested Dematus across all symbols on the M5 timeframe with a $10,000 deposit. Symbol Pass Result Profit Expected Payoff Profit Factor Recovery Factor Sharpe Ratio Custom Equity DD % Trades EURJPY 16 5359.37 11591.27 19.95 2.86 2.30 0.25 0 26.20 581 GBPJPY 19 4646.45 13861.37 18.63 2.49 2.46 0.19 0 50.32 744 EURGBP 13 3471.68 4345.42 19.84 2.69 1.18 0.24 0 35.49 219 GBPUSD 1 3462.21 6094.22 19.35 2.70 0.64 0.22 0 93.60 315 In our tests using all symbols on the M5 timeframe with a $10,000 deposit, we found varying levels of success. Check out the detailed results in the table above to see how Dematus performed against different currency pairs. So if you're looking to enhance your trading game, give Dematus a shot. It could be just the tool you need to elevate your trading strategy!

2018.08.23
Unlocking the Sidus EA for MetaTrader 5: A Trader's Guide
MetaTrader5
Unlocking the Sidus EA for MetaTrader 5: A Trader's Guide

Author of the Idea: Mikhail MQL5 Code Author: barabashkakvn 
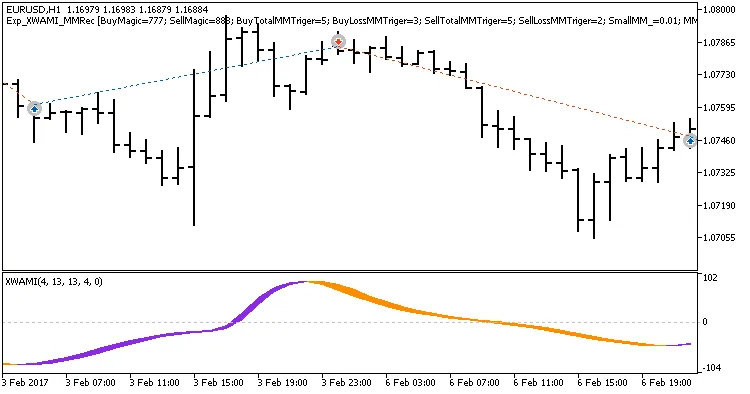
The Sidus Expert Advisor (EA) utilizes two key indicators: the iAlligator (Alligator) and the iRSI (Relative Strength Index). The Alligator serves as the primary indicator, while the RSI acts as a trend filter to enhance decision-making. Using RSI as a Filter When RSI #2 is less than 50.0 and RSI #1 is greater than 50.0, this filter checks the conditions for opening a BUY position. Conversely, if RSI #2 is greater than 50.0 and RSI #1 is less than 50.0, it checks the conditions for a SELL position. 
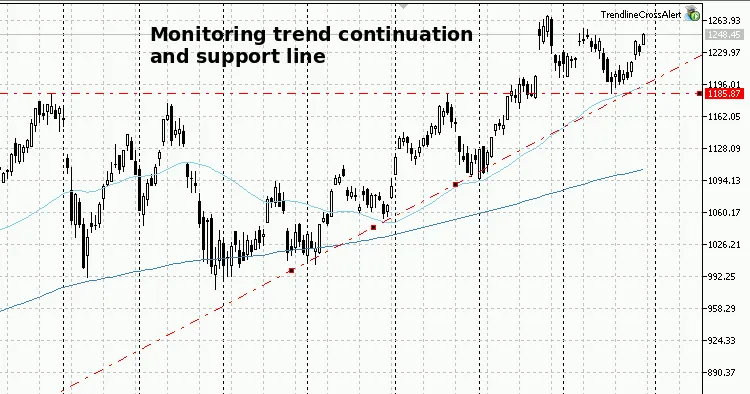
Alligator Signals Explained The Alligator signals are based on the Delta between Alligator lines (#1 - #2), which indicates the difference between the indicator lines on bars #1 and #2. If Jaw #1 minus Jaw #2 is greater than Delta, and Teeth #1 minus Teeth #2 is greater than Delta, and Lips #1 minus Lips #2 is greater than Delta, this generates a BUY signal. On the flip side, if Jaw #1 minus Jaw #2 is less than Delta, and Teeth #1 minus Teeth #2 is less than Delta, and Lips #1 minus Lips #2 is less than Delta, it generates a SELL signal. Trading Parameters to Know The EA operates by checking signals only when a new bar forms, whereas trailing happens with every tick. The position volume is fixed and defined as Lots. Stop loss is calculated dynamically based on the following: For BUY: it’s calculated as Low#1 minus Offset. For SELL: it’s calculated as High#1 plus Offset. Take profit is fixed and can be set in Take Profit. If you wish to disable take profit, simply set it to "0.0". Trailing is managed by two parameters: Trailing Stop and Trailing Step. To turn off trailing, set the Trailing Stop to "0.0". The Delta between Alligator lines (#1 - #2) has been described earlier. If Closing Opposite Positions is set to "true", it means that positions contrary to the current signal will be closed. 
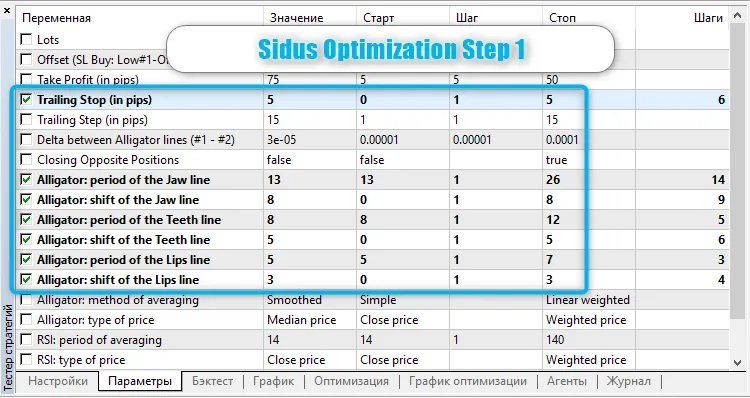
Steps for Optimization 
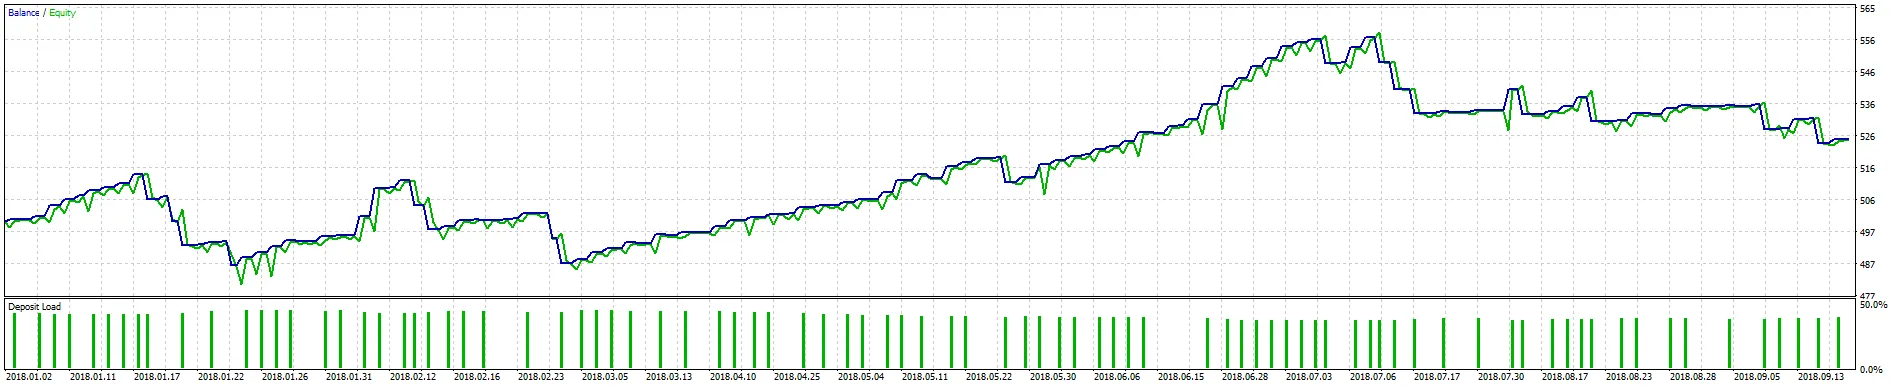
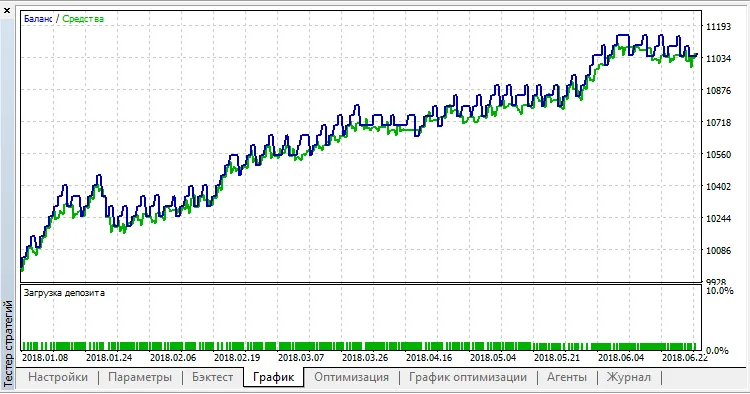
Start by selecting the trailing and Alligator parameters. I recommend using genetic optimization since we’re iterating over trailing, which operates on each tick. For testing, I’ve chosen the USDJPY on the M15 timeframe. Next, check the best results across all symbols. 
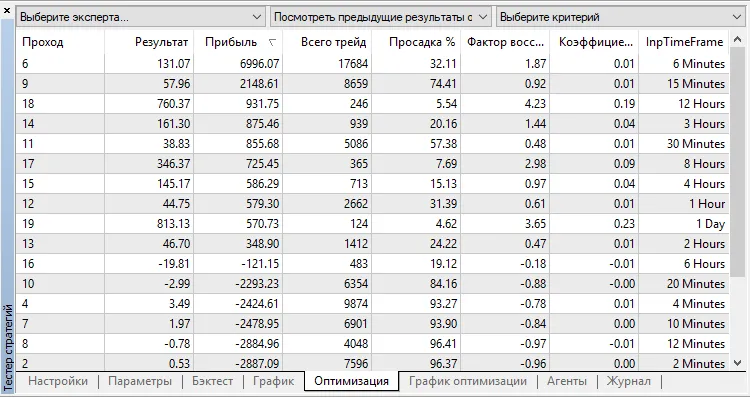
After completing the first optimization step, head over to the Optimization tab and click on the Result column to sort the outcomes, ensuring the best results are at the top. Right-click on the top result and select "Run a single test" to initiate the test with the best EA parameters set in the Parameters tab. Finally, navigate to the "Settings" tab and select "By all symbols" from the "Optimization" dropdown menu.

2018.08.23
Maximize Your Trades with the XWAMI Trading System for MetaTrader 5
MetaTrader5
Maximize Your Trades with the XWAMI Trading System for MetaTrader 5

Hey fellow traders! If you're looking to enhance your trading strategy, let me introduce you to the XWAMI trading system. This innovative system leverages the XWAMI indicator to signal trades, adjusting the volume based on the outcomes of your previous trades. Pretty neat, right? So, how does it work? The system generates trading signals at the close of a bar, especially when a trend shift occurs, marked by a color change in the cloud. This gives you a clear visual cue to make your next move. Managing Your Trade Volumes One of the standout features of this EA (Expert Advisor) is its ability to manage the volume of your open positions. The input EA variables allow you to set parameters that tailor the trading strategy to your needs: input uint    BuyTotalMMTriger=5; // Last 5 Buy trades for stop losses count input uint    BuyLossMMTriger=3;  // Number of loss-making Buy trades to lower volume input uint    SellTotalMMTriger=5;// Last 5 Sell trades for stop losses count input uint    SellLossMMTriger=3; // Number of loss-making Sell trades to lower volume input double  SmallMM_=0.01;      // Portion of funds used in a trade during losses input double  MM=0.1             // Portion of funds used in a trade during normal trading input MarginMode MMMode=LOT;      // Method for calculating lot size With these settings, if you’ve had three losing trades out of the last five in one direction, the EA will open the next trade in that direction with a volume of 0.01 lots. If you’ve got fewer than three losing trades, the volume will be set at 0.1 lots. This strategy helps to minimize risks while taking advantage of market conditions. Getting Started To ensure the EA runs smoothly, make sure you have the XWAMI.ex5 indicator file saved in the <terminal_data_directory>\MQL5\Indicators folder. This is crucial for the EA to function properly. During testing, the default inputs with stops were used, and the results were promising. Check out the performance below: Fig. 1. Examples of trades on the chart Here's a look at the testing results for 2017 on the EURUSD H1 timeframe: Fig. 2. Testing results chart

2018.08.23
Unlocking Trading Success with Freeman: Your Go-To EA for MetaTrader 5
MetaTrader5
Unlocking Trading Success with Freeman: Your Go-To EA for MetaTrader 5

Idea Contributor: vgs MQL5 Code Creator: barabashkakvn Hey fellow traders! Today, let’s dive into a straightforward yet powerful concept that can elevate your trading game using the Freeman EA for MetaTrader 5. The strategy is simple: when the RSI dips into the oversold zone and starts to turn upwards while the Moving Average is on the rise, that’s your cue to buy. The same logic applies in reverse for selling. One of the standout features of this EA is its dual parameter sets. You can select from a quicker setting for more frequent trades or a more extended setting for fewer but potentially more precise entries. It's like tailoring your approach to fit your trading style! We also incorporate the Average True Range (ATR) for calculating stop-loss and take-profit levels. This EA can sort your trades by trend, utilizing the H1 Moving Average as a filtering mechanism. It’s all about making your trading strategy more robust! Input Parameters Lots: Volume of the position you want to open; SL Factor: Stop loss calculated as SL Factor * ATR; TP Factor: Take profit calculated as TP Factor * ATR; Trailing Stop: Enables trailing stop; Trailing Step: Defines the trailing step; Positions Maximum: Maximum number of open positions; Distance between Positions: Gap between trades; Bars Control: Trading type: each tick or new bar only; Position Locking Coefficient: Position ratio if the previous one closed at a loss; Use RSI Set #1: Activate RSI #1 parameters; Use RSI Set #2: Activate RSI #2 parameters; MA First, ATR: Averaging period; MA Second: Averaging period; MA Filter: Averaging period; MA Smoothing Type: Type of smoothing for MA First, Second, and Filter; Price Type: Type of price for MA First, Second, and Filter; RSI First: Averaging period; RSI Second: Averaging period; RSI Sell Level #1: Sell level for RSI parameters #1; RSI Buy Level #1: Buy level for RSI parameters #1; RSI Sell Level #2: Sell level for RSI parameters #2; RSI Buy Level #2: Buy level for RSI parameters #2; Signal Bar Number: Indicator bar number; Trend Filter: Use a trend filter; Trade on Friday: Enable or disable trading on Fridays; Begin Trade Hour: Start trading hour ("0" to disable); End Trade Hour: End trading hour ("0" to disable); Magic Number: Unique identifier for the EA. Test results in "Every tick" mode across various symbols on the M15 timeframe are as follows: Symbol Pass Result Profit Expected Payoff Profit Factor Recovery Factor Sharpe Ratio Custom Equity DD % Trades EURGBP 12 575.67 80.94 0.56 1.83 1.95 0.19 0 1.38 144 EURJPY 15 321.64 77.95 0.31 1.52 1.23 0.10 0 2.05 253 EURCHF 13 306.95 43.83 0.28 1.41 0.68 0.10 0 2.11 157 USDCAD 5 270.04 56.87 0.24 1.39 0.82 0.09 0 2.30 238 AUDUSD 6 232.34 35.64 0.19 1.30 0.91 0.08 0 1.29 186 EURCAD 4 202.97 47.71 0.18 1.31 0.87 0.07 0 1.82 264 CHFJPY 11 194.00 37.23 0.18 1.25 0.63 0.06 0 1.95 202 AUDJPY 9 171.69 29.55 0.15 1.21 0.68 0.06 0 1.44 197 USDJPY 3 169.57 28.51 0.15 1.23 0.54 0.06 0 1.77 195 AUDCAD 8 95.83 13.75 0.08 1.13 0.27 0.03 0 1.67 175 EURUSD 0 34.48 9.78 0.04 1.05 0.14 0.01 0 2.38 228 CADCHF 18 5.86 0.93 0.00 1.00 0.02 0.00 0 2.05 200 GBPCHF 17 -14.52 -4.64 -0.02 0.98 -0.06 0.00 0 2.36 189 GBPJPY 19 -16.28 -10.41 -0.03 0.97 -0.08 -0.01 0 4.08 308 GBPUSD 1 -54.34 -22.53 -0.09 0.92 -0.15 -0.02 0 5.16 241 EURNZD 16 -66.62 -16.25 -0.07 0.91 -0.26 -0.02 0 2.09 241 USDCHF 2 -104.34 -26.89 -0.14 0.86 -0.27 -0.04 0 3.29 186 EURAUD 14 -116.65 -31.03 -0.13 0.84 -0.33 -0.04 0 3.09 242 AUDCHF 10 -149.68 -37.55 -0.21 0.82 -0.34 -0.05 0 3.62 181 AUDNZD 7 -221.88 -36.76 -0.21 0.74 -0.61 -0.07 0 2.00 174

2018.08.23
Master Your Trading with the Wajdyss Ichimoku Candle System for MetaTrader 5
MetaTrader5
Master Your Trading with the Wajdyss Ichimoku Candle System for MetaTrader 5

Are you ready to elevate your trading game? The Wajdyss Ichimoku Candle trading system is here to help you spot trends and manage your trades like a pro. This system not only generates signals based on trend changes but also adjusts the volume of your upcoming trades based on the performance of your previous ones. The system includes a handy block of input EA variables that allows you to manage the volumes of your open positions effectively: input uint    BuyLossMMTrigger=2;  // Number of losing Buy trades to decrease MM input uint    SellLossMMTrigger=2;  // Number of losing Sell trades to decrease MM input double  SmallMM=0.01      // Share of funds from the deposit for trades in case of losses input double  MM=0.1             // Share of funds from the deposit for normal trades input MarginMode MMMode=LOT;      // Method for calculating lot sizes With these settings, if your last two trades were both losers, the EA will open your next trade in the same direction with a volume of 0.01 lots. However, if at least one of those trades was a winner, the volume will be set at 0.1 lots. To get this EA running smoothly, make sure the compiled wajdyss_Ichimoku_Candle.ex5 indicator file is located in the <terminal_data_directory>\MQL5\Indicators folder. Below are the test results using the default parameters with stops: Fig. 1. Examples of trades on the chart Testing results for 2017 on AUDUSD (H2 timeframe): Fig. 2. Testing results chart

2018.08.23
Unlock Your Trading Potential with the Open Oscillator Cloud EA for MetaTrader 5
MetaTrader5
Unlock Your Trading Potential with the Open Oscillator Cloud EA for MetaTrader 5

Hey fellow traders! Today, I want to share an exciting trading system that leverages the Open Oscillator Cloud indicator. This system is designed to help you adjust your trade volumes based on the outcomes of your previous trades. It’s a neat way to manage risk while keeping an eye on market trends. The magic happens when a bar closes and signals a trend change, indicated by a shift in the cloud's color. Let’s dive into how you can manage your trading volumes effectively using the Expert Advisor (EA). Customizable Input Parameters To tailor your trading experience, the EA includes a block of input variables that help you control the volumes of your open positions: input uint    BuyLossMMTrigger=2;  // Number of losing Buy trades to reduce MM input uint    SellLossMMTrigger=2;// Number of losing Sell trades to reduce MM input double  SmallMM=0.01;      // Portion of funds used in a trade during losses input double  MM=0.1;            // Portion of funds used in a trade during standard trading input MarginMode MMMode=LOT;      // Method for calculating lot size With these inputs, if your last two trades in a particular direction ended up being losses, the EA will open the next trade in the same direction with a volume of 0.01 lots. However, if at least one of the last two trades was profitable, then the position volume will be set to 0.1 lots. It’s a clever way to scale your trading based on performance! Setting Up Your EA For the EA to function correctly, make sure to have the compiled Open_Oscillator_Cloud.ex5 indicator file located in your <terminal_data_directory>\MQL5\Indicators folder. This is essential for smooth operation. Testing Insights During testing, default input parameters with stops were utilized, and here are some results from 2017 on the AUDUSD H2: Fig. 1. Examples of trades on the chart Fig. 2. Testing results chart So there you have it! The Open Oscillator Cloud EA can be a game-changer for your trading strategy. Happy trading!

2018.08.23
Mastering GBP9AM: Your Guide to the MetaTrader 5 EA
MetaTrader5
Mastering GBP9AM: Your Guide to the MetaTrader 5 EA

Idea Creator: Scriptor MQL5 Code Author: barabashkakvn This Expert Advisor (EA) is designed to align with your local time zone. For instance, if you're in a +1 hour zone, it will trigger at 9 AM London time. The EA sets up pending Buy Stop and Sell Stop orders based on the Lots parameter which determines the volume of these orders. The Buy Stop and Sell Stop orders are positioned at specified distances from the current price, which you can customize. The Take Profit levels are identical for both Buy and Sell Stops, but the Stop Loss settings can be tailored individually through the designated parameters. If you set the Ignore Close Hour flag to "true", the EA will automatically close all positions and cancel any remaining pending orders after the specified hour. The Report Publication Interval parameter allows you to set how often (in seconds) the trading statistics and current positions are updated. When testing the EA, make sure to do it in "Every Tick" mode across all symbols: Symbol Pass Result Profit Expected Payoff Profit Factor Recovery Factor Sharpe Ratio Custom Equity DD % Trades EURAUD 13 265.21 561.50 4.53 1.69 4.38 0.31 0 13.68 124 GBPJPY 19 144.02 420.61 3.36 1.35 1.97 0.20 0 29.86 125 EURUSD 0 103.70 395.40 3.21 1.34 2.06 0.15 0 29.69 123 USDCHF 3 89.13 350.40 3.10 1.39 1.44 0.14 0 60.60 113 GBPUSD 2 64.84 260.40 2.08 1.18 1.29 0.12 0 29.16 125 EURNZD 15 53.76 201.18 1.61 1.20 0.88 0.11 0 43.31 125 EURJPY 17 50.16 200.36 1.60 1.16 0.72 0.10 0 53.53 125 AUDJPY 9 31.48 99.77 0.93 1.12 0.66 0.08 0 27.34 107 CHFJPY 12 18.62 52.53 0.44 1.05 0.24 0.05 0 46.22 120 AUDCHF 10 17.52 42.17 0.41 1.05 0.21 0.05 0 44.98 103 CADCHF 18 -2.30 -234.27 -2.66 0.76 -0.95 -0.04 0 81.99 88 USDJPY 4 -2.70 -71.70 -0.71 0.93 -0.26 -0.01 0 58.21 101 AUDCAD 8 -3.76 -112.35 -1.09 0.85 -0.53 -0.02 0 66.34 103 EURCHF 14 -5.58 -199.46 -2.06 0.80 -0.78 -0.06 0 72.15 97 USDCAD 6 -6.83 -204.65 -2.59 0.76 -0.99 -0.07 0 68.50 79 AUDUSD 5 -8.48 -235.10 -3.36 0.66 -0.88 -0.13 0 80.47 70 GBPCHF 16 -10.16 -173.36 -1.77 0.87 -0.32 -0.08 0 81.25 98 EURCAD 1 -14.23 -188.36 -2.99 0.75 -0.77 -0.13 0 68.57 63 AUDNZD 7 -15.25 -154.48 -1.64 0.72 -0.58 -0.10 0 72.39 94 EURGBP 11 -19.68 -204.14 -7.29 0.59 -0.76 -0.21 0 73.99 28

2018.08.23
Unlocking Trading Success: The Rj Sliding Range System for MetaTrader 5
MetaTrader5
Unlocking Trading Success: The Rj Sliding Range System for MetaTrader 5

If you’re on the lookout for a robust trading system, let me introduce you to the Rj Sliding Range System. This system is designed to enhance your trading strategy by signaling potential entry points while allowing you to set a fixed holding time for your positions. Here’s how it works: the system generates a signal when a bar closes and there’s a channel breakthrough. If the holding time for your position exceeds a set limit, the position will be automatically closed. This feature can help you manage your trades more effectively and avoid unnecessary losses. input bool   TimeTrade=true;      //Enable position exit by time input uint   nTime=1920;           //Open position holding time in minutes This Expert Advisor leverages the compiled indicator file Rj_SlidingRangeRj_Digit_System.ex5 to operate seamlessly. Make sure to place it in your <terminal_data_folder>\MQL5\Indicators folder for it to work. During testing, we used the default input parameters for the Expert Advisor, which yielded some interesting results. Check out the chart below for a visual representation of trades taken with this system: Fig. 1. Examples of trades on the chart Looking at the testing results from 2017 for the EURAUD H8 pair, we can see the effectiveness of the system: Fig. 2. Testing results chart

2018.08.23
Mastering the Crossing Moving Average EA for MetaTrader 5
MetaTrader5
Mastering the Crossing Moving Average EA for MetaTrader 5

Author of the Idea: Scriptor MQL5 Code Author: barabashkakvn This Expert Advisor (EA) kicks into gear whenever a new bar forms. The position volume is fixed and managed via the Lots parameter. You can also toggle Stop Loss, Take Profit, and Trailing Stop by setting their values to "0.0" if you prefer not to use them. Pay particular attention to the Trailing Step setting, which controls the trailing step distance. At the heart of this EA are two Moving Averages, referred to as the First and Second. The crossing method is straightforward (not the most precise, but definitely easy to understand) by examining the values of the indicators on two consecutive bars: //--- Buy Signal &nbsp;&nbsp; if(MA_First[1] > MA_Second[1] + ExtMA_MinimumDistance && MA_First[2] < MA_Second[2] - ExtMA_MinimumDistance) ... //--- Sell Signal &nbsp;&nbsp; if(MA_First[1] < MA_Second[1] - ExtMA_MinimumDistance && MA_First[2] > MA_Second[2] + ExtMA_MinimumDistance) ... Here's what those terms mean: MA_First[1] - Value of the First indicator on bar #1; MA_First[2] - Value of the First indicator on bar #2; MA_Second[1] - Value of the Second indicator on bar #1; MA_Second[2] - Value of the Second indicator on bar #2; ExtMA_MinimumDistance - This is the calculated parameter that determines the minimum distance between the two indicators (Minimum Distance Between MAs). You can disable this feature completely by setting it to "0.0" in the inputs. Each signal generated is then filtered through the Momentum indicator, which checks if the Momentum filter parameter is active. Visually, this process can be illustrated as follows: Here’s a test run on EURUSD M15:

2018.08.23
Mastering CCI and Martin with MetaTrader 5: A Trader's Guide
MetaTrader5
Mastering CCI and Martin with MetaTrader 5: A Trader's Guide

Author of the Idea: Vladimir MQL5 Code Author: barabashkakvn This EA utilizes the iCCI (Commodity Channel Index) indicator value from the last four bars, alongside Open and Close prices from the last three bars. The system checks for a position opening signal when there are less than 20 seconds remaining before the current bar closes. This is a rare approach and is only executed if there are no open positions by this EA. Position Opening Conditions //--- BUY &nbsp;&nbsp; if(cci[1]&lt;5 &amp;&amp; cci[2]&lt;cci[3] &amp;&amp; cci[1]&lt;cci[2] &amp;&amp; cci[0]&gt;cci[1] &amp;&amp; &nbsp;&nbsp;&nbsp;&nbsp;&nbsp;&nbsp;Open[2]&gt;Close[2] &amp;&amp; Open[1]&gt;Close[1] &amp;&amp; Open[0]&lt;Close[0] &amp;&amp; Open[1]&lt;Close[0]) //--- SELL &nbsp;&nbsp; if(cci[1]&gt;-5 &amp;&amp; cci[2]&gt;cci[3] &amp;&amp; cci[1]&gt;cci[2] &amp;&amp; cci[0]&lt;cci[1] &amp;&amp; &nbsp;&nbsp;&nbsp;&nbsp;&nbsp;&nbsp;Open[2]&lt;Close[2] &amp;&amp; Open[1]&lt;Close[1] &amp;&amp; Open[0]&gt;Close[0] &amp;&amp; Open[1]&gt;Close[0]) Where: cci[] - array of CCI indicator values; Open[] and Close[] - arrays of open and close prices respectively. Main Trading Settings Lots - constant position volume (if martingale and incremental volume increase are disabled) or the initial lot size for martingale and incremental volume increase; Stop Loss ("0.0" → disabled); Take Profit ("0.0" → disabled); Trailing Stop ("0.0" → disabled); Trailing Step. CCI Parameters CCI: Averaging Period - the averaging period; CCI: Type of Price - type of price used to calculate the indicator. Position Volume You can define this in one of the following ways: fixed lot (Lots); martingale (Use martingale); incremental volume increase (Use step by step). Note: Avoid using martingale and incremental volume increase at the same time! Choose only one method or disable both. Let's dive deeper into the last two methods for setting position volume: Martingale This method kicks in when a losing position (or positions) shows up in your trading history. Key settings include: Use martingale - martingale activation flag; Martingale Coefficient - the ratio for increasing position volume; Ordinal Number of the Losing Trade - the index of the losing trade where volume increase starts; Maximum Number of Multiplications - the cap on how many times position volume can increase in a row. Volume Incremental Increase This method applies to both losing and winning position series. Key settings include: Use step by step - flag to activate incremental lot increases; Step Lots - the volume increase step; Maximum Lots - the peak volume to be used with incremental lot increases; Use Step After... - apply incremental volume increase after: ... losing - a losing trade; ... profitable - a profitable trade. When using martingale, be cautious with the Stop Loss, Take Profit, Trailing Stop, and Trailing Step parameters, in addition to martingale settings. The default parameters are M15, with an initial deposit of $10,000, tested across all symbols: SymbolPassResultProfitExpected PayoffProfit FactorRecovery FactorSharpe RatioCustomEquity DD %Trades EURGBP 12 510.69 678.56 3.29 1.27 0.55 0.05 0 12.14 206 USDCHF 1 180.17 250.96 0.81 1.08 0.32 0.02 0 7.25 310 EURCHF 14 178.94 227.73 0.80 1.08 0.22 0.02 0 9.93 284 USDCAD 3 87.20 113.09 0.28 1.03 0.15 0.01 0 7.26 409 AUDJPY 9 27.45 1.28 0.00 1.00 0.00 0.00 0 7.44 417 CADCHF 18 -42.18 -101.84 -0.37 0.97 -0.09 0.00 0 10.53 272 AUDUSD 5 -82.46 -160.03 -0.53 0.95 -0.14 -0.01 0 10.91 301 EURCAD 6 -82.68 -233.21 -0.42 0.95 -0.19 -0.01 0 11.98 562 USDJPY 4 -90.72 -211.15 -0.52 0.95 -0.21 -0.01 0 9.63 404 EURUSD 0 -181.05 -451.65 -1.07 0.90 -0.24 -0.02 0 17.60 422 AUDNZD 7 -227.43 -305.03 -0.94 0.89 -0.39 -0.02 0 7.54 324 GBPUSD 2 -245.81 -838.84 -1.76 0.86 -0.62 -0.03 0 13.20 477 EURNZD 15 -390.22 -1381.32 -2.01 0.80 -0.68 -0.05 0 20.18 686 EURJPY 16 -390.24 -1210.77 -2.19 0.80 -0.58 -0.04 0 20.45 553 EURAUD 13 -477.19 -1483.33 -2.41 0.77 -0.64 -0.06 0 22.12 616 GBPJPY 19 -558.54 -2645.95 -3.87 0.69 -0.81 -0.08 0 32.18 683 GBPCHF 17 -626.44 -3325.40 -6.56 0.63 -0.83 -0.09 0 39.28 507 AUDCHF 10 -738.94 -1472.97 -5.11 0.67 -0.67 -0.09 0 21.09 288 CHFJPY 11 -920.15 -5540.53 -12.95 0.42 -0.92 -0.21 0 58.57 428 AUDCAD 8 -1541.16 -3692.85 -12.69 0.35 -0.94 -0.24 0 39.19 291

2018.08.23
First Previous 12 13 14 15 16 17 18 19 20 21 22 Next Last